1. Introduction
Franklyn’s architecture currently consists of three major components:
-
an Angular frontend
-
a quarkus server responsible for recording screenshots and managing clients
-
a quarkus client running on each student pc during an exam
2. Using docker images
The easiest way to install franklyn is using docker
For this the following things are needed:
-
some linux-based server
-
with docker support
-
-
the ability to use sudo
-
(a static public ip-address)
-
the ability to open ports to the internet (in particular 80 and 443)
-
a domain name
| The following commands in this tutorial are assuming the server is running Ubuntu-server-22.04-LTS. Commands might be different when using a different linux distribution. |
2.1. Server and Frontend
2.1.1. Setting up nginx reverse-proxy
The first step of setting up franklyn is installing a webserver. In this tutorial we will be using nginx. To install nginx the following commands have to be executed in a terminal:
sudo apt update
sudo apt install nginx
After installation make sure the nginx service is running using:
sudo systemctl status nginxAmidst the output one should see Active: active (running).
In case Active: inactive (dead) is shown instead try enabling and starting the nginx service using:
sudo systemctl enable --now nginxThe next thing to do is set up port-forwarding of port 80 and 443. Depending on the used provider the required steps might look vastly different.
For oracle vm’s
In case an oracle virtual machine is used, the following steps can be used to set up port-forwarding:
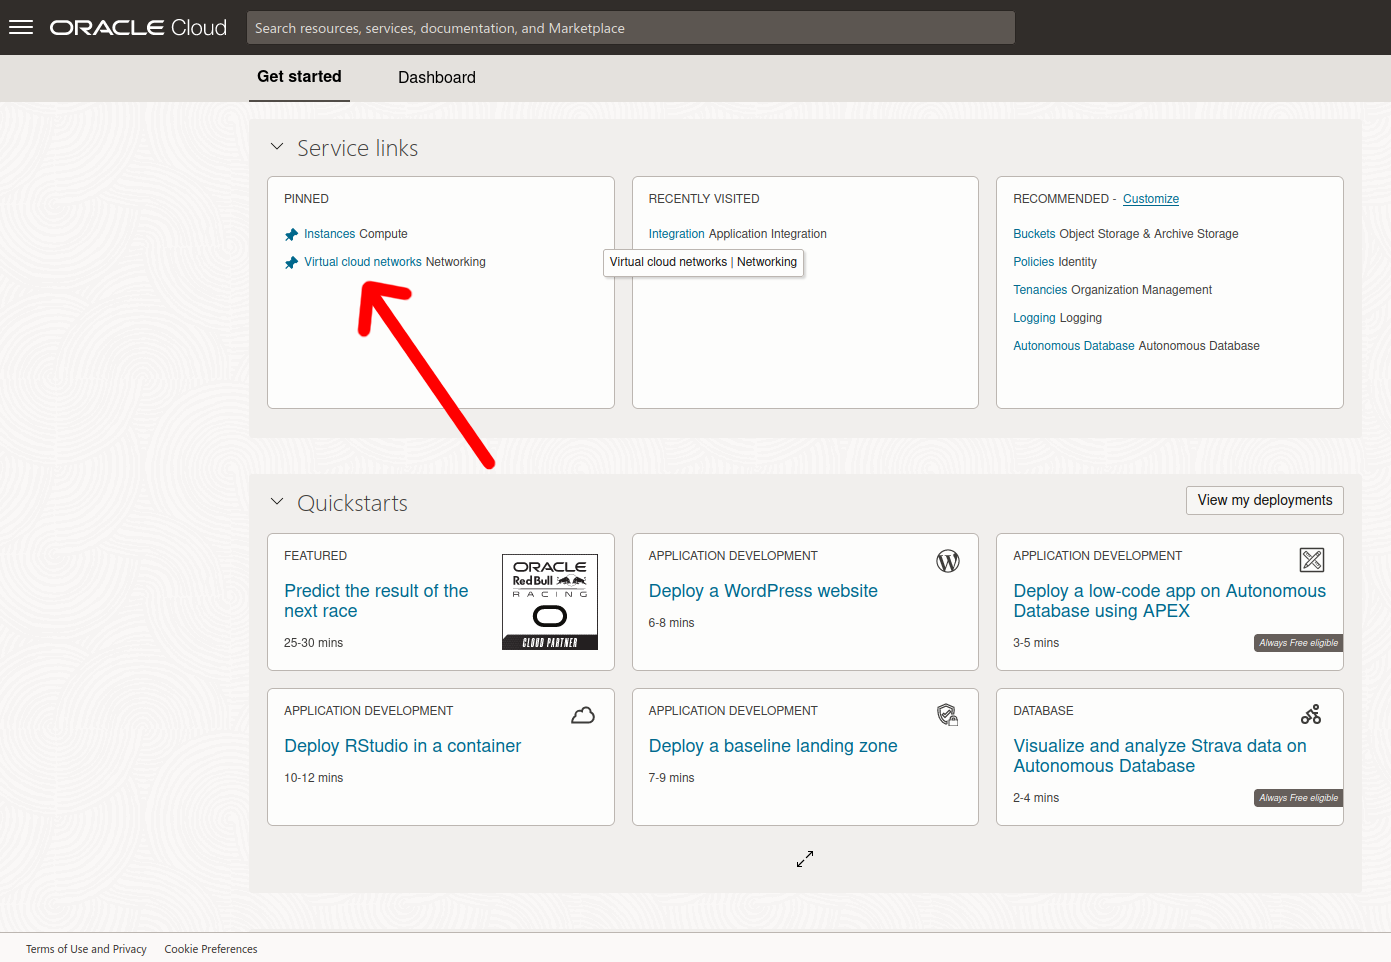
Go to the dashboard and click on virtual cloud networks
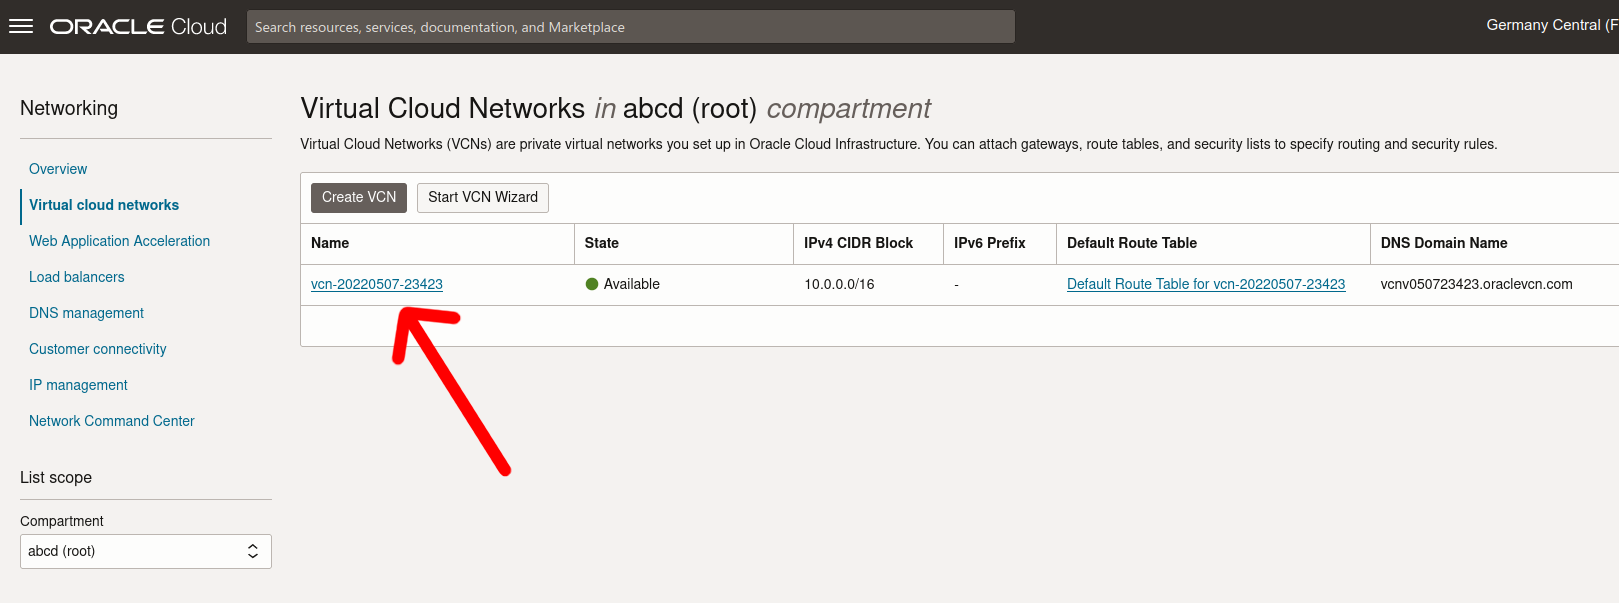
Then click on the virtual cloud network the instance is in
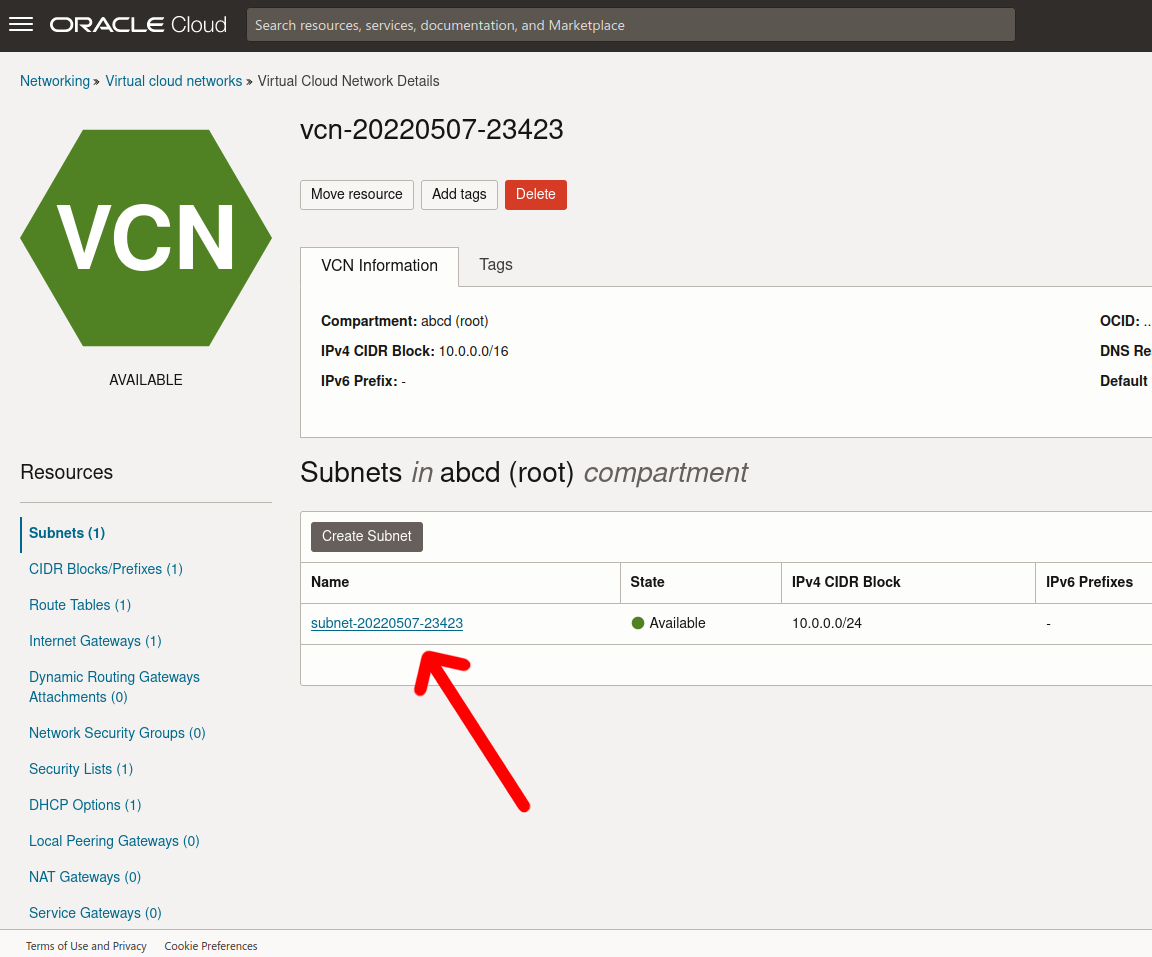
Followed by a click on the available subnet
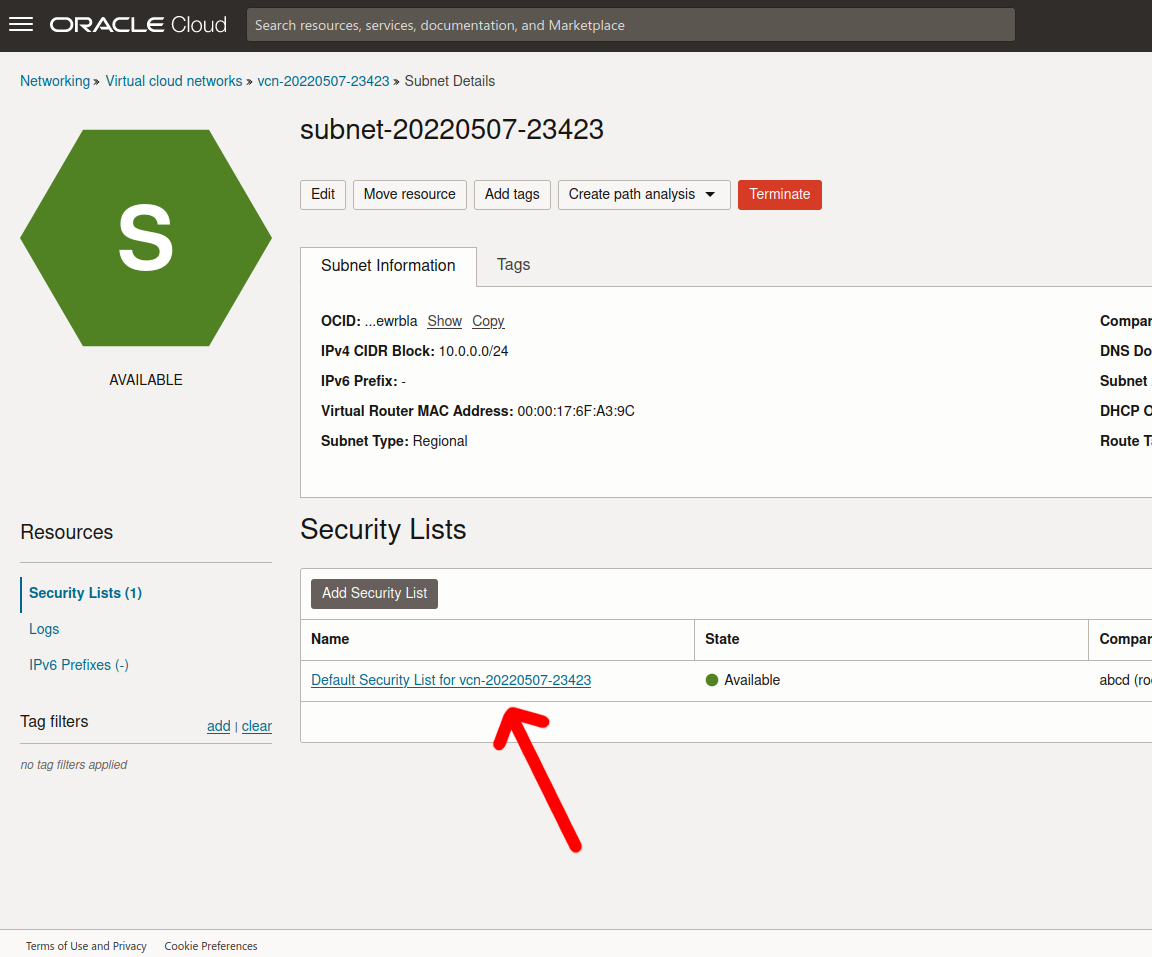
And a click on the default security list
Finally, add a new ingress rule
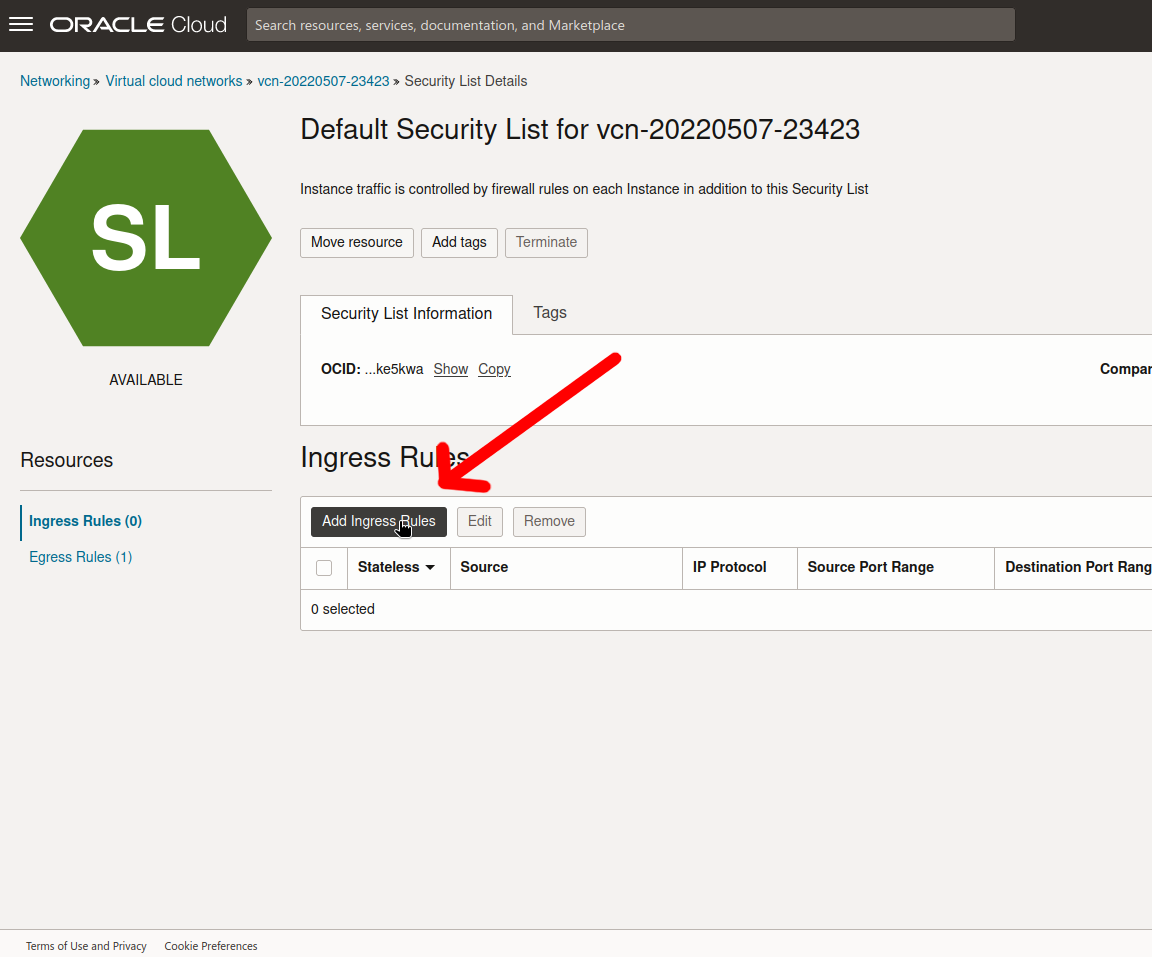
And enter the following:
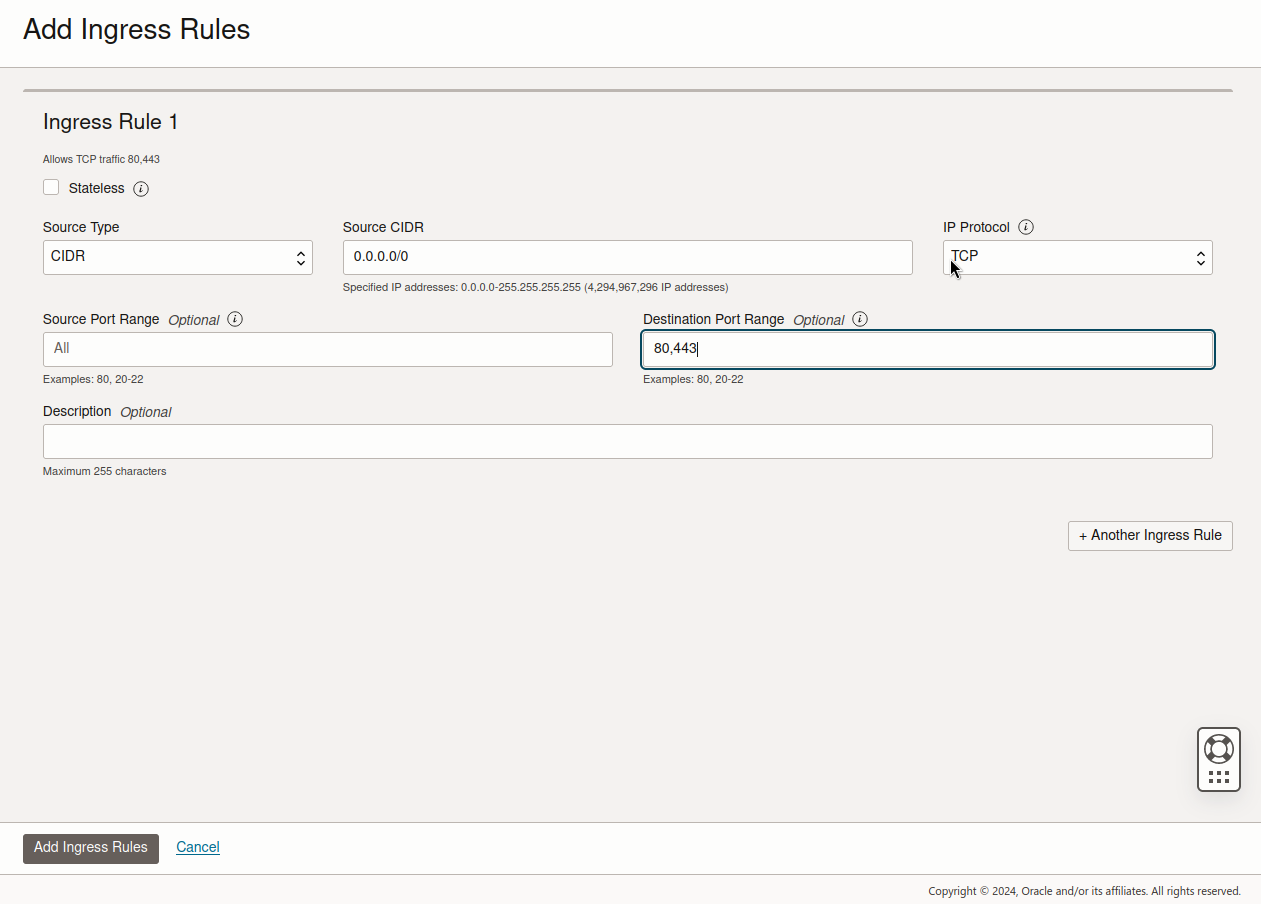
Click on Add Ingress Rules.
Lastly execute the following commands in the instances' terminal:
sudo apt install firewalld
sudo firewall-cmd --zone=public --permanent --add-port=80/tcp
sudo firewall-cmd --zone=public --permanent --add-port=443/tcp
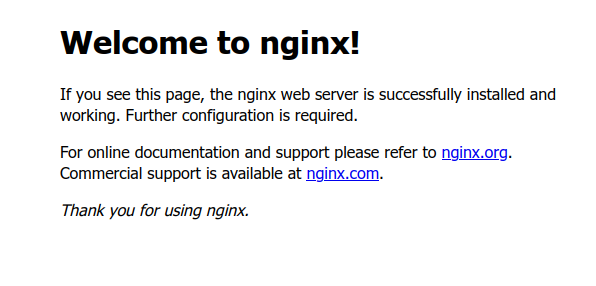
sudo firewall-cmd --reloadWhen done correctly visiting http://<public-ip>; should show a nginx welcome screen:
Before continuing make sure the domain name points to the public ip-address of the server. Usually this can be configured on the domain-name providers website.
When done correctly visiting http://<domain-name>; should now also show the same nginx welcome screen.
The next step is getting a certificate for the domain. Use the following commands to install certbot on the server:
sudo snap install --classic certbot
sudo ln -s /snap/bin/certbot /usr/bin/certbot
After that run sudo certbot certonly --nginx to generate a new certificate for the domain. This will ask a few basic questions including an e-mail address and the domain name.
Using the certificate nginx can now be configured to use tls. Overwrite /etc/nginx/nginx.conf with the following:
user www-data;
worker_processes auto;
pid /run/nginx.pid;

events {}

http {
	include /etc/nginx/mime.types;
	server {
		listen 80;
		server_name <your-domain-name>;

		return 301 https://$host$request_uri;
	}

	server {
		server_name <your-domain-name>;

		location / {
		    root /var/www/html;
            index index.html;
		}

		location /downloads/ {
		    alias /var/www/downloads/;
		    add_header Content-disposition "attachment; filename=$1";
            default_type application/octet-stream;
		}

		location /api/ {
			proxy_pass http://127.0.0.1:8080/;
			# Websocket support
			proxy_http_version 1.1;
			proxy_set_header Upgrade $http_upgrade;
			proxy_set_header Connection "upgrade";
			# increase max file upload limit
			client_max_body_size 100M;
			# increase timout to prevent 504 when clicking on show-video
			proxy_read_timeout 600s;
		}

		if ($http_referer ~ ^https?://<your-domain-name>/instructor/) {
                rewrite ^ /instructor$uri;
        }

		location /instructor/ {
		    proxy_pass http://127.0.0.1:8088/;
		}

		location = /instructor/ {
		    proxy_pass http://127.0.0.1:8088/index.html;
		}

		listen 443 ssl;

		ssl_certificate /etc/letsencrypt/live/<your-domain-name>/fullchain.pem;
		ssl_certificate_key /etc/letsencrypt/live/<your-domain-name>/privkey.pem;
		include /etc/letsencrypt/options-ssl-nginx.conf;
	    ssl_dhparam /etc/letsencrypt/ssl-dhparams.pem;
	}
}
And restart nginx with:
sudo systemctl restart nginx2.2. Setup instructor client and franklyn server
Now that nginx is set up the frontend and server applications are next. First install git and clone the franklyn GitHub repository:
sudo apt install git
git clone https://github.com/2324-4bhif-syp/2324-4bhif-syp-project-franklyn.git
In order to host the webservers docker and docker-compose are required.
How to install docker is not covered here but is explained at https://docs.docker.com/engine/install/
Now enter the project directory and start franklyn using docker-compose:
cd 2324-4bhif-syp-project-franklyn/
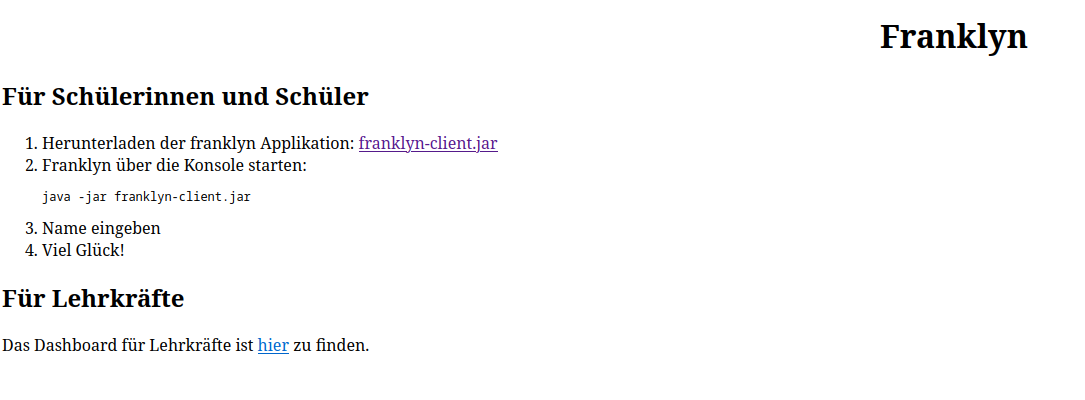
docker compose -f cicd/docker-compose.yaml up -dFinally, copy the static index.html start page into /var/www/html/
cd 2324-4bhif-syp-project-franklyn/
sudo cp -f nginx/index.html /var/www/html/
You should now see the franklyn start page when visiting https://<domain-name>:
2.3. Student Client
The last thing to do is preparing the student client (also known as openbox). Why is this needed? Per default the generated openbox artifact on GitHub points at our development domain franklyn.ddns.net. To work with other servers this domain has to be changed and the jar rebuilt.
To do this clone the repository (in case you have not done so already):
git clone https://github.com/2324-4bhif-syp/2324-4bhif-syp-project-franklyn.git
cd 2324-4bhif-syp-project-franklyn
For building the student-client the following dependencies are required:
-
java 17or newer -
maven
To install them execute:
# for java
sudo apt install openjdk-21-jdk
sudo apt install maven
Open openbox/src/main/resources/application.properties and change:
%prod.websocket.url=wss://franklyn.ddns.net/api
%prod.http.url=https://franklyn.ddns.net/api
to
%prod.websocket.url=wss://<your-domain-name>/api
%prod.http.url=https://<your-domain-name>/api
Make sure you have all dependencies installed and run the following command in the projects root directory
./cicd/build-openbox.shdist/openbox/ now contains a file called franklyn-student-client.jar. Make sure to copy this jar to /var/www/downloads/ and create the folder in case it does not exist
mkdir -p /var/www/downloads/
sudo cp -f dist/openbox/franklyn-student-client.jar /var/www/downloads
You’re set!